Turn your home kitchen into a version of Charlie and the Chocolate Factory, minus the squirrels, the glass elevator and the edible wallpaper.
Tempering chocolate is the golden ticket to shiny, beautiful chocolate confections. Use it to create a shiny and solid case for your ganache truffles or as a decoration. And with a little practice, you too can make chocolates even Willy Wonka would be jealous of.
")
What Does Tempering Chocolate Mean?
Lemme get a little science-y for a minute. Chocolate is a combination of cacao, milk solids, sugar, and cocoa butter. The cocoa butter inside the chocolate gives chocolate its smooth mouth-feel because it’s a fat. However, sometimes fat separates and floats to the top of a food product, as you’ve probably seen happen with other foods. Like salad dressing.
Think of chocolate as a salad dressing. When you leave a salad dressing on the counter for a few hours the vinegar and oil separate. The same thing can happen to chocolate once it’s heated. Once the chocolate is taken off the heat and begins to cool, the cocoa butter begins to crystalize. It’s separated from the rest.
The crystallization of the cocoa butter is uneven and produces a dull looking chocolate which never fully sets at room temperature. Further on, bloom may show up on the chocolate (those pesky white bubbles of fat on the chocolate).
There is a solution to this separation problem.
By tempering your chocolate you are able to control the crystallization, resulting in a shiny chocolate finish along with that snap you get when breaking a piece of store-bought chocolate in half.
Tempering chocolate is a simple process that only requires a bit of time and a thermometer. To temper you must bring your chocolate to a high enough temperature to break up all cocoa butter solids and bonds. Then you bring the temperature down to create uniform crystallization of the chocolate. Last, you will barely heat the chocolate back up to the point where it is ready to use.
These are the three temperatures you need to be aware of:
- Heating the Chocolate : 121-131°F
- Cooling the Chocolate : 80-84°F
- Warming the Chocolate: 86°F
How To Temper Chocolate
Step #1
Measure out the chocolate you will be using (either in cups or with a scale). You’ll start by using 3/4 of it. So set 1/4 of it aside.

Step #2
Finely chop ¾ of the chocolate. This will make the chocolate melt more evenly.

Step #3
Put all that chocolate in a large bowl. Chop the remaining ¼ of the chocolate. This will be used for a process called seeding.

Step #4
Melt the big bowl of chocolate. You can either melt the chocolate over a double boiler, which is more controlled, or in the microwave. Today we decided to use the microwave, stirring the chocolate every thirty seconds until melted.

Remember the temperatures we discussed earlier? This is the first of them. The Chocolate must reach 121-131°F to temper properly. Use an instant read thermometer to make sure it’s right.

Step #5
Begin adding the seeding chocolate to the melted chocolate a little at a time.

Stir the chocolate until it melts.

The solid chocolate should begin bringing the temperature down immediately.

Once the chocolate is melted add another handful and stir.

After all the chocolate is melted, the tempered chocolate should begin to thicken.

Step #6
Here’s the second temperature! The chocolate is tempered once it reaches 80-84°F. If the chocolate is still above the temperature, continue to stir until the chocolate reaches the desired temperature.

Step #7
Once the chocolate is at the correct temperature, test the chocolate by dipping some parchment paper into the chocolate. After a few minutes the chocolate should already begin to harden. (This was hard for us because our kitchen was so hot on that day. We live in Florida. It’s an issue. Always.) You can see that it’s starting to set at the edges.

After assuring that your chocolate is tempered you may begin using it. If the chocolate is getting too thick you can warm it up in ten-second increments in the microwave, never going above 86°F. Once over that temperature, the temper is broken and you will have to start over again. And that’s no fun.
Print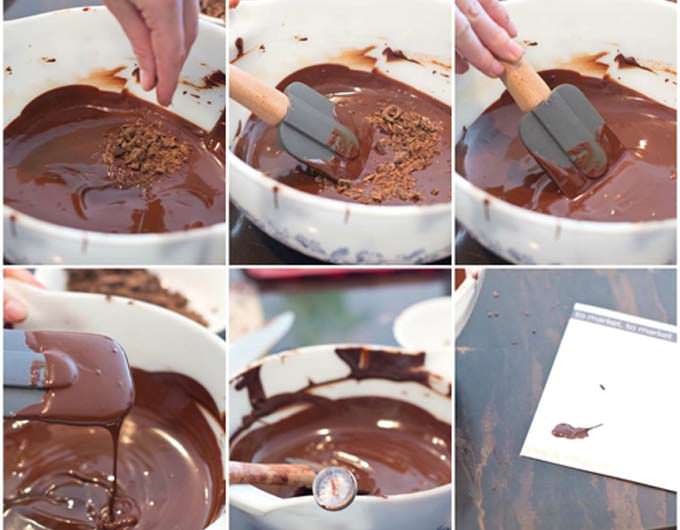
How To Temper Chocolate
- Prep Time: 5 minutes
- Cook Time: 10 minutes
- Total Time: 15 minutes
- Yield: 2 cups 1x
- Category: Dessert
- Method: Microwave
- Cuisine: American
Ingredients
- 2 cups chocolate chips, divided
Instructions
- In microwave melt 1 and 1/2 cups of chocolate chips to 121-131°F, stirring every thirty seconds.
- Once the temperature is reached remove from microwave and stir in remaining 1/2 cup of chocolate chips. Stir until chocolate reaches 80-84°F. Test temper by dipping a piece of parchment paper in the chocolate. After a few minutes the chocolate should be hardened on the paper.
- Use chocolate as needed. If the chocolate is too thick warm up slowly in microwave, stirring every ten seconds, to 86°F.
This post originally appeared in February 2016 and was revised and republished in February 2022.


Thank you so much for the step by step and including the specific temperatures! Very helpful.
You’re welcome!
Can I store the tempered chocolate, or does it need to be used immediately?
Can I use unsweetened chocolate and add sugar before melting?
No, it won’t temper properly if you add sugar to it before melting, Susan. If you want to sweeten it, you’ll need to add sugar after it is melted, a little bit at a time while stirring.
Just wanted to point out that in step 3, the recipe says “stirring every ten minutes”. It should be every 10 seconds as noted in the article.
Thanks, Dan. The mistake has been fixed.
Good illustration. I don’t have a thermometer. Is it possible without one?
Unfortunately, this is one of those cases where a thermometer really does help.
It’s worth mentioning the difference between couverture and coating chocolate. The melting wafers frequently sold at bulk food stores are coating chocolate, and contain no real cocoa butter, and therefore do not require tempering. Couverture chocolate contains cocoa butter and requires tempering, and is way more expensive, but is worth the price for the difference in quality.