Air Fryer Chicken Leg Quarters
This is how to air-fry chicken legs so that they are extra juicy inside with super-crispy skin. The key is starting with them skin-side down first.
Chicken leg quarters are the drumstick attached to the thigh. They’re very budget-friendly, partly because the butcher has not removed the skin or bone (less work). You can often get a big bag of them for a very reasonable price. This is one of my favorite ways to cook them. Note that the video below shows how to cook more than you’d expect in even a smaller air fryer.
Scroll down to read more details or click here to jump straight down to the recipe.
Video: Air Fryer Chicken Legs
How To Remove Skin From Chicken Leg Quarters
If your chicken leg quarters have skin on them, as most of them do, and you want to remove it, you have two options.
Option #1: Remove the skin before cooking. With leg quarters, the skin is often attached pretty firmly in a couple places and it can be tough to get off just by pulling. I grip the skin at the edge of the thigh end and pull it off as much as I can. Anywhere that I run into trouble and find that it’s stuck to the meat or bone, I use clean kitchen shears (these are essentially just sharp scissors) to snip it off.
Option #2: Cook the chicken with the skin on, as instructed below. Then let it rest for 2 minutes before using your fingers to pull off the skin. It will come off super easily. If it happens to be stuck somewhere, go in with those kitchen shears as above. Just make sure the shears are clean and have not had contact with raw chicken.
How to choose between option 1 and 2? I prefer option 2 because it’s easier and because you get the flavor and some juice from the skin dripping onto the chicken meat as it cooks. This adds moisture and flavor but doesn’t add much in the way of fat.
But here’s a warning… that skin is going to be plentiful and crispy and seriously delicious. If I pull it off at this point, I tend to eat it. If you don’t want that temptation, remove the skin and discard it before cooking the chicken. If you have better willpower than I do, go ahead and remove it after cooking.
Prepping the Chicken Leg Quarters
To start, coat the chicken leg quarters in a little bit of oil. Do this whether or not the chicken has skin on it. I use olive oil in an oil sprayer like this one. I love it because I can fill it with my own olive oil, making it much cheaper and more convenient than canned cooking spray. Also, the sprayer works great. I’ve had mine for years!
Next, season the chicken with salt, black pepper and garlic powder. Go in with different seasonings if you’d like, but make sure to include salt.
Time and Temperature
They will take 30-35 minutes at 400°F. But you’ll flip them halfway through. Here are more details:
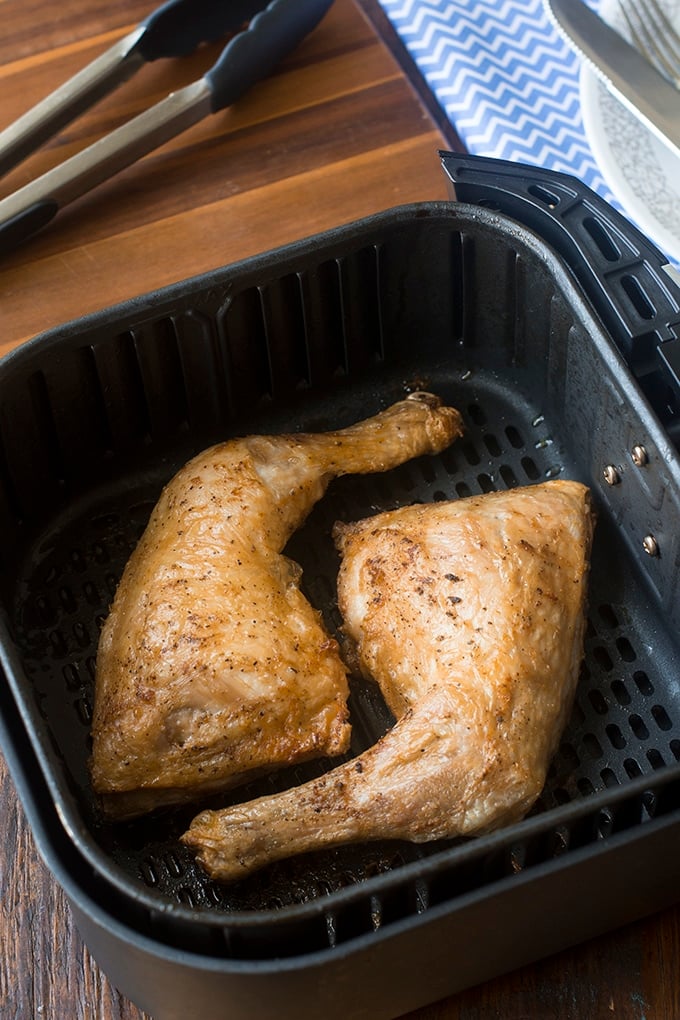
Put the chicken leg quarters into the air fryer basket skin-side-down (or more-rounded-side-down if they’re skinless) and cook them for 20 minutes. Flip them. My air fryer has a non-stick basket so I use tools that are non-metal and thus won’t scratch and ruin the surface. After flipping them, you’re going to cook them until they reach 165°F inside, as read on an instant read thermometer. It will take 10-15 more minutes.
Finally, you take the chicken out of the basket (use those silicone tongs again) and let it rest for 2 minutes before serving.
Grab and knife and fork and dig in for a hearty and delicious piece of chicken!
More Cuts Of Chicken In The Air Fryer
Find out the perfect temperature and timing for these other cuts of chicken.
Podcast Episode: Air Frying Chicken
Listen to our editor, Christine Pittman, explain briefly how to make this chicken, with some great tips along the way, by clicking the play button below:
Listen to more Recipe of the Day episodes here.
Print
Air Fryer Chicken Leg Quarters Recipe
- Prep Time: 5 minutes
- Cook Time: 30 minutes
- Total Time: 35 minutes
- Yield: 2 servings 1x
- Category: Entrée
- Method: Air Fryer
- Cuisine: American
DESCRIPTION
Air fried chicken leg quarters are the best. Not only are they super affordable but you get a thigh and drumstick in one serving – nice juicy flavorful meat!
Ingredients
- 2 chicken leg quarters with skin* (one pound each)
- 1 Tbsp. olive oil (or use olive oil sprayer)
- 1/4 tsp. salt
- 1/4 tsp. black pepper
- 1/4 tsp. garlic powder
Instructions
- Preheat air fryer to 400°F. Remove chicken leg quarters from refrigerator.
- Coat chicken on all sides with olive oil.
- Sprinkle on all sides with salt, pepper, garlic powder.
- Put chicken in air fryer basket, skin-side-down, in a single layer. The two chicken quarters should not overlap. Cook 20 minutes.
- Flip chicken and cook until 165°F on an instant read thermometer, 10-12 more minutes. It could take longer depending on your brand of air fryer so do check with the thermometer and cook longer if needed.
- Remove from basket and let rest at least 2 minutes before serving.
Love this recipe? I’d appreciate it if you could scroll down and add a *5 star rating* to help others know they’ll love it as well!
Notes
*For skinless chicken leg quarters, use the exact same method. Nothing needs to be changed except put them in rounded-side-down (that’s the side that would have had the skin on it if it had skin).
This post originally appeared in September 2019 and was revised and republished in November 2022.






Easy. Juicy. Tasty.
Thanks, Jesse!
This recipe is super easy and the chicken came out juicy and with loads of flavor this is how I’m baking chicken from now on
Thank you, Angela!
200 * is Celsius….. Same ad 400* farenheit
My air fryer only goes to 200degrees so how long should I cook my Maryland
Only 200 degrees Fahrenheit? What kind of air fryer do you have? If it’s in Celsius that’s almost 400°F so you can follow the recipe given. At 200°F, it would be a very slow cook to get them to the safe internal temperature of 165°F, likely 2.5 – 3 hours.
I also like to use One and Done spice or Lemon Pepper on my chicken.
I do not have a basket only 2 wire racks. Do I put 1 leg quarter on each rack and place them in the oven, or put 2 quarters on one rack . I have a ProAir small Air Fryer.
I’m not familiar with that type of air fryer, Carrie. The ones we use have a basket, explained here – https://www.hotairfrying.com/models/basket-type-air-fryers/ I would see if your model has any tips or instructions. If there’s room for both on one rack without them overlapping, I would think that would be fine.
Last 10 min brush with BBQ sauce, also in the beginning sprinkle with lemon pepper for a different taste.. enjoy the difference tastes.
Thanks for sharing with us, Donna. Enjoy!
I don’t need an air fryer! I have a brand new induction/convection oven! It the same as an air fryer. I use a bbq grill basket w/ a cookie sheet on the shelf below & it works great! The chicken was perfect!
Thanks for sharing with us, Eva! Yum!
My air fryer fits 2 quarter legs. I followed the 4 instructions, spray and season, time and temperature and it came out perfect. My daughter was really happy. It was yummy……Thank you!
You’re welcome, Violeta! So happy you enjoyed.
Frozen from refrig ok? In refugee overnight but still seems frozen?
Renee, I’m not sure, to be honest. In the regular oven frozen chicken takes about 1.5 times as long as thawed chicken so you could try that. I’m concerned that the high-intensity heat of the air fryer could burn the outside though. If you try it, please come back and let us know how it turned out.
Cooked this tonight. Chicken cooked perfect. My cooker holds three quarters and they were all fine.
Thank you! So happy you enjoyed, Deborah!
Made this last night according to recipe. The chicken did not cook in the 32 minutes. 😞
Michelle, how long did yours take?
Same question from me!
I have the smaller air fryer. I can only cook one quarter at a time – which is perfect as it’s just me. Is the cook time the same ? There is no preheating on the smaller Dash air fryer
The time should be the same, Christine. Enjoy!
I’m a novice. I read to preheat to 400°. But what temperature do I cook at to reach 165° internal temperature? Sorry. I’m sure it’s silly to you. But I’m looking at 4 leg quarters my husband bought and I want to get it right for the fam! 😊
No problem, Suzi. They’ll be cooked at 400 degrees, and should reach 165 internal by the end of the recommended cook time. We always like checking with a meat thermometer to make sure it’s reached a safe temperature for eating. You can learn more about cooking chicken in the air fryer here – https://thecookful.com/how-to-cook-chicken-in-the-air-fryer/
My main comment is just that the recipe cook time says 20 minutes, but if we flip after 20 minutes then cook for an additional 10-12, shouldn’t the cook time say 30-32 minutes?
You’re right, Monica, thanks for catching that! We’ve edited the cook time to the correct 30 minutes.