Air Fryer Chicken Thighs
Here’s everything you need to know about cooking chicken thighs in the air fryer. How long, what temperature, boneless skinless thighs (in bundles and unrolled), bone-in skin-on thighs, and everything in between!
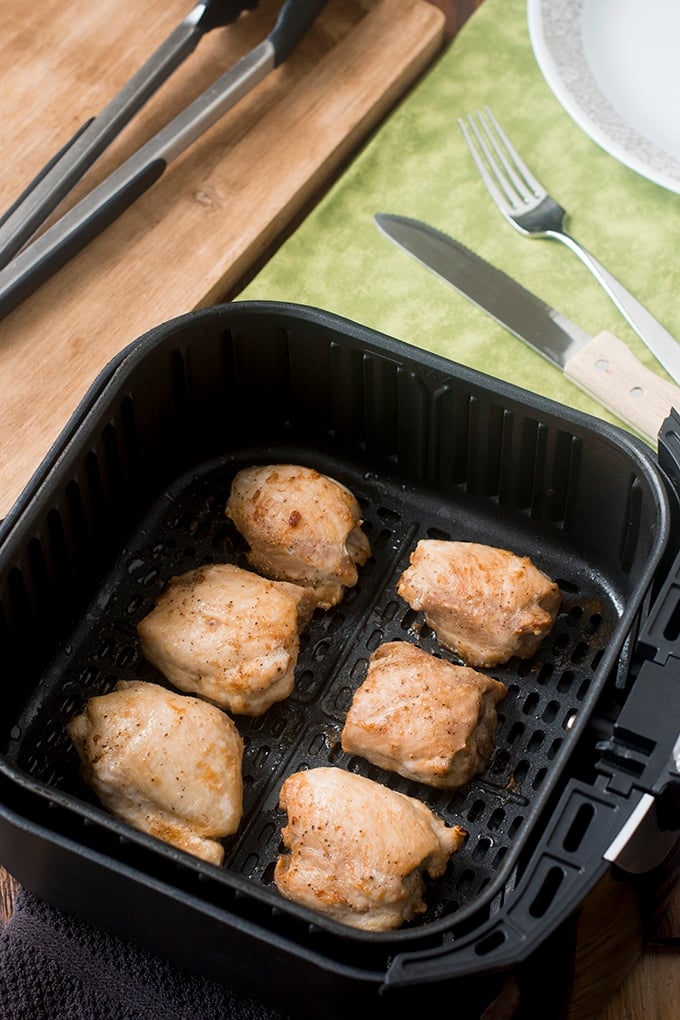
The goal is juicy, perfectly browned chicken thighs cooked in the air fryer. Here, I’m explaining how many thighs you can fit in there, how much oil you need on them, how much seasoning, how long to cook them, and at what temperature. And I’m giving info for bone-in chicken thighs, boneless chicken thighs, thighs with and without skin, and for whether you should cook boneless chicken thighs in little bundles (like in the picture below) or unrolled.
You can scroll down to get all the information, or click here to jump straight down to the recipe.
- Video: Air Frying Chicken
- What Type Of Oil and How Much
- How Much Seasoning To Use
- Boneless Skinless Chicken Thighs In The Air Fryer
- Bone-In Chicken Thighs In The Air Fryer
- Times and Temperature
- Meal Prepping Chicken Thighs In The Air Fryer
- Chicken Thighs With Skin In The Air Fryer
- More Chicken Thigh Recipes
- Podcast Episode: Making Air Fryer Chicken Thighs
- Air Fryer Chicken Thighs Recipe
Video: Air Frying Chicken
What Type Of Oil and How Much
Regardless of what type of chicken thighs you have, you’ll start by coating the chicken in a little bit of oil. The oil helps the chicken brown and stops it from drying out on the outside. Olive oil and grapeseed oil are my go-to’s. Canola and vegetable oil are also fine options. If you have another go-to oil that you use for cooking chicken, that will work here also. Note that melted butter isn’t a great idea since it will scorch in the air fryer.
I typically go with olive oil in an oil sprayer like this one. I love it because I can fill it with my own olive oil, making it much cheaper and more convenient than buying cooking spray. Also, the sprayer works great. I’ve had mine for years! Or you can use the store-bought cooking spray, totally. No judgment here!
If you don’t have oil spray, use 1 tablespoon of oil for 6 chicken thighs, whether they’re bone-in or boneless, skin-on or without skin.
How Much Seasoning To Use
Season the chicken with salt and whatever other seasonings you’d like. I keep it basic with black pepper and garlic powder. You can have a look at all my homemade seasoning blend recipes here too to get some inspiration.
You typically want about 1/8 teaspoon of salt per chicken thigh (half of that on each side), and about the same amount total of whatever other seasonings you’re using. Just make sure that if you’re using salt, you don’t use a seasoning mix that also contains salt.
If you’re keeping your thighs in bundles and you have an extra minute, unroll them and season the inside, and then roll them back up. It just gets seasoning into every little bite. If you’re planning to cook them unrolled, unroll them before seasoning both sides.
Boneless Skinless Chicken Thighs In The Air Fryer
Often, boneless skinless chicken thighs are sold as little bundles of thighs on a tray. Essentially, the butcher has removed the bone and then wrapped the meat back up around where the bone was. See the picture at the top of this article to see what chicken thighs cooked as bundles look like.
To fit more chicken thighs into your air fryer, you should leave them in the bundles. They take up less room that way. I can easily fit 6-8 chicken thighs in mine like this.
However, if you aren’t cooking that many, then you can unroll them into flat almost-cutlets. Those cutlets give you more surface area for seasoning, and also more surface area for browning. They also take less time to cook. I can only fit 4 chicken thighs in my air fryer if I unroll them.
The main difference for cooking them is the time they’ll need. Unrolled chicken thighs won’t need as long to cook. I also don’t flip them so that at least one side gets the chance to get nice and brown in the shorter time.
Also, if in bundles, I tend to put them rounded side down to start so that after I flip them partway through cooking, the nicer side is up and gets the final bit of browning. If you unroll them before cooking, you should put them nice-side-up since we won’t be flipping them.
Bone-In Chicken Thighs In The Air Fryer
If you have chicken thighs with the bone (with or without skin), they will be like the bundles above, but with the bone inside. The only change is the amount of time they’re in the air fryer for.
Oil and season them as instructed, and you’ll start them rounded-side-down when you first put them in the air fryer. If they’re skin-on, that means they’ll be skin-side-down.
Times and Temperature
Whatever kind of chicken thighs you have, it’s important to put them in the air fryer basket in a single non-overlapping layer with a bit of room around each one. This is to help them cook more evenly.
Set the air fryer to 400°F (no need to preheat it) and put the basket with the chicken thighs in there. Then these are the cooking times:
- Boneless Skinless Chicken Thighs in Bundles: Cook for 10 minutes and then flip and cook for 5-7 minutes more.
- Unrolled Boneless Skinless Chicken Thighs: Cook for 10 minutes.
- Bone-In Chicken Thighs (with or without skin): Cook for 15 minutes and then flip and cook for 10-15 minutes more.
Regardless of which type of chicken thigh you have, make sure that they have reached an internal temperature of 165°F, as read on an instant read thermometer. Or cut into them to check that they’re no longer pink inside.
After you take the chicken thighs out of the basket, let them rest for 2 minutes before serving. Note that I don’t really put them on a special plate or anything to rest. Generally, by them time I plate them and get our other food onto plates, the 2 minutes is up.
Meal Prepping Chicken Thighs In The Air Fryer
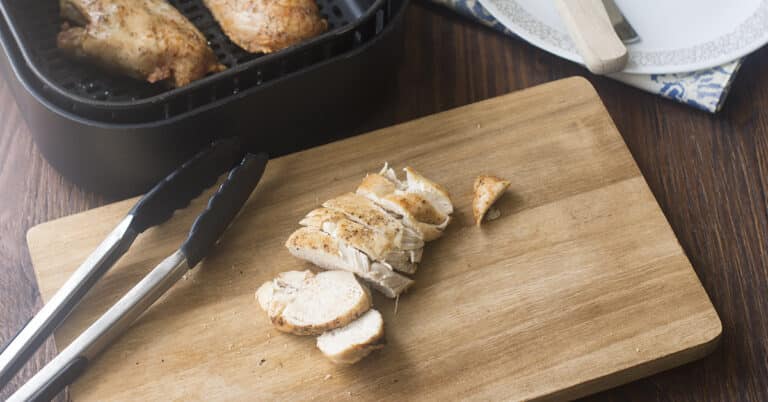
The air fryer is a great way to pre-cook chicken as part of your meal prep. I also often cook chicken thighs in the Instant Pot for this purpose, so keep that in mind as another option. Anyhow, if you’re planning to use the chicken thighs at another time, let them cool for 10 minutes after you take them out of the air fryer. Then put them whole into a sealed container, or slice them and put them in the container. Refrigerate for up to 3 days.
Chicken Thighs With Skin In The Air Fryer
In general, whether the chicken thigh has skin or not doesn’t affect the recipe.
If you have boneless chicken thighs that have skin, the recipe below without any modifications will work perfectly. So you’ll be cooking your thighs for 10 minutes on one side (skin-side-down) first and then flip them and cook them for another 5-7 minutes, or until they reach 165 degrees Fahrenheit on an instant read thermometer.
If you have bone-in chicken thighs that have skin, you’ll use the bone-in method above. You’ll cook them skin-side-down for 15 minutes and then skin-side-up for another 10-15 minutes, or until they reach 165 degree Fahrenheit on an instant read thermometer.
How to Remove Skin from Chicken Thighs
If your thighs have skin but you don’t want it on there, you have two options.
- Remove the skin before cooking. With thighs, the skin often will just pull right off. If it’s stuck somewhere, I find that clean kitchen shears (these are essentially just sharp scissors) work to snip away any spots where the skin is attached to the meat.
- Cook the chicken as instructed for with-skin. Then let it rest for 2 minutes before using your fingers to pull off the skin. It will come off super easily. If it happens to be stuck somewhere, go in with kitchen shears as above. Just make sure the shears are clean and have not had contact with raw chicken.
How do you choose between option 1 and 2? I prefer option 2 for two reasons. First, it’s easier. Second, you get the flavor and some juice from the skin dripping onto the chicken meat as it cooks. This adds moisture and flavor but doesn’t add much in the way of fat.
Ok, I think that’s all of my advice. Now you can go try making chicken thighs in the air fryer. I can’t wait to hear what you think!
More Chicken Thigh Recipes
Browse all our chicken recipes or try these delicious recipes with chicken thighs.
- Air Fryer Chicken Shawarma
- Boiled Chicken Thighs
- Easy Baked Chicken Thighs
- Smoked Chicken Thighs
- Chicken Tinga Recipe
- Sous Vide Chicken Thigh Recipe
- Instant Pot BBQ Chicken Thighs
Podcast Episode: Making Air Fryer Chicken Thighs
Listen to me explain briefly about how to make this recipe, with some great tips along the way, by clicking the play button below:
Listen to more Recipe of the Day episodes here.
Print
Air Fryer Chicken Thighs Recipe
- Prep Time: 5 minutes
- Cook Time: 15 minutes
- Total Time: 20 minutes
- Yield: 3 servings 1x
- Category: Entrée
- Method: Air Fryer
- Cuisine: American
DESCRIPTION
Chicken thighs are my go-to cut of chicken because they’re juicier and more flavorful than chicken breast. The biggest win? They turn out amazing in the air fryer too!
Ingredients
- 1 and 3/4 lbs. (about 6) boneless, skinless chicken thighs*
- 1 Tbsp. olive oil (or use olive oil sprayer)
- 3/4 tsp. salt
- 1/4 tsp. black pepper
- 1/4 tsp. garlic powder
Instructions
- Coat chicken on all sides with olive oil.
- Sprinkle all over with the salt, pepper, and garlic powder.
- Arrange chicken thighs in a single non-overlapping layer in the air fryer basket, rounded-side-down**. Put the basket into the air fryer.
- Set air fryer to 400°F. Cook for 10 minutes.
- Flip chicken and cook until 165°F. on an instant read thermometer, about 5-7 more minutes.
- Remove from basket and let rest at least 2 minutes before serving.
Love this recipe? I’d appreciate it if you could scroll down and add a *5 star rating* to help others know they’ll love it as well!
Notes
*For bone-in thighs, with or without skin, follow the instructions above exactly except after you first put the thighs into the air fryer, cook them for 15 minutes. Then flip and cook until the interior is 165°F as read on an instant read thermometer, which will take another 10-15 minutes.
**This recipe is assuming that the chicken thighs have not been unrolled. Chicken thighs often come in a tray with each one wrapped around where the bone used to be. If you instead want to cook your chicken thighs unrolled, so they’re essentially like a flatter cutlet, see the information in the blog post above.
This post originally appeared in September 2019 and was revised and republished in March 2025.





These turned out perfectly! I added some extra seasonings, but these easy instructions were just what I needed.